The HVAC Inspection Guide
Introduction
This article will cover the details and help inform you of what to expect during an HVAC inspection. Looking for tips to check out your own unit? Check out The HVAC Troubleshooting Guide Every Home Owner Should Know.
What is an HVAC inspection?
How much does an HVAC inspection Cost?
What should be inspected during an HVAC inspection?
How do I prepare for my HVAC inspection?
What should I do if I find a problem?
How Much Do HVAC Repairs Cost
Should I Replace My HVAC Unit
Home Warranty For HVAC Equipment?
Conclusion
1. What Is An HVAC Inspection?
If you're a homeowner, property manager or commercial building owner, you know that routine maintenance is key to keeping your home or building in good shape. The same is true for your HVAC and mechanical systems. Regular inspections can help to ensure that your systems are running efficiently and can help to prevent small problems from becoming big ones.
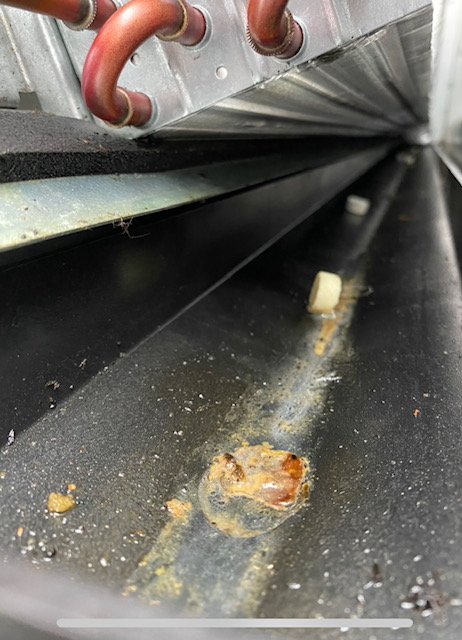
HVAC unit with a leaking condensate pump and drain line
So, what is an HVAC inspection? An HVAC inspection is a thorough inspection that includes an evaluation of all components within the HVAC heating and cooling system.
A professional HVAC technician performs the HVAC inspection to determine the proper function and cleanliness of all system components and mechanical safeties. The tech will verify the overall condition and age of the system to ensure all is in proper working order
Fouled heat exchanger on a Hydronic HVAC unit
During an HVAC inspection, the technician will check the condition of your furnace, air conditioner, and all of the other major components. They will also test the system using specialized tools to ensure it is operating correctly. After the inspection, you will receive a report detailing any problems or deficiencies found. The Tech will provide the recommended corrective action plan if any is needed to bring the unit to operational condition.
HVAC units that are not regularly inspected or maintained experience shorter useful life and are more likely to experience costly repairs and downtime
An HVAC inspection is an essential part of routine maintenance for your home. Regularly scheduled HVAC maintenance and inspections can significantly prolong your HVAC equipment's useful life and help prevent costly emergency repairs.
2. How Much Does An HVAC Inspection Cost?
HVAC is the general trade term that encompasses all types. HVAC stands for Heating, Ventilation, and Air Conditioning, but not all HVAC equipment will have heating and cooling options. The cost of an HVAC inspection can vary based on the unit's size, the unit's age, the unit's type, and the unit's overall condition. A typical inspection will cost between $150 and $500.
An HVAC unit optioned with only heating will cost less to inspect and maintain than a unit with Air conditioning or cooling capabilities. Complex boiler and chiller systems using water to heat or cool the space can cost even more.
3. What Should Be Inspected During An HVAC Inspection?
During an HVAC inspection, all of the major and minor components should be checked to ensure proper operation. The following list provides a great guide for performing the HVAC inspection.
-The condition of the air ducts and registers/diffusers
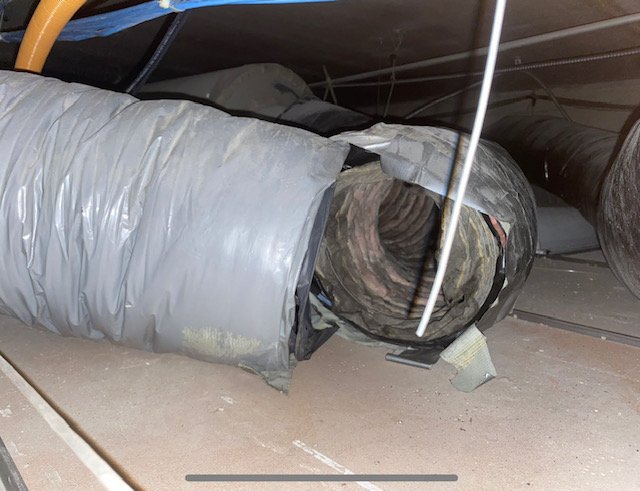
This flex duct has failed allowing the heated/cooled air to escape to a non occupied space
Proper ductwork is vital to your HVAC equipment’s operation and should be inspected for leaks, tears, and cracks during an HVAC inspection. To function correctly, an HVAC system must have the ability to transfer heat. The most common method for distributing heat is through the air. As you can see from the photo above, the ductwork has split apart in the middle allowing that air to escape to the attic space above the space we are trying to heat/cool. This will cause the unit to run more often, use more energy, and decrease the unit's life span.
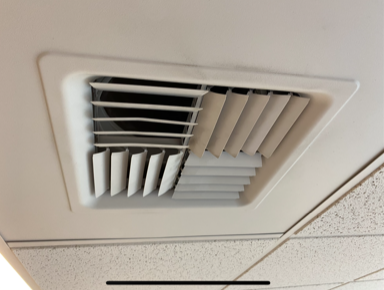
Air registers, diffusers, or grilles should also be checked during the HVAC inspection to ensure that they have not been closed or damaged, preventing the conditioned air from entering the space it was intended to go.
HVAC Diffuser completely closed off
HVAC Diffuser Opened
-Air filter replacement
Air filters are vital to improving indoor air quality and keeping the air in your space clean. They also protect the HVAC equipment by filtering out a large portion of the particulate in the air before it becomes lodged in the air coil, builds up on the fan wheel, and settles in the ductwork. It is crucial to change the air filter regularly to prevent starving the unit of the airflow it needs to operate. A dirty or plugged filter can lead to much more expensive repairs.
It is important to note all filters are not created equal. There are many different MERV ratings available for both residential and commercial applications. The higher the MERV rating, the more particulate is filtered out.
Be sure to consult with your HVAC Technician before increasing your filters MERV rating to ensure your HVAC equipment can adequately handle the reduction in airflow caused by more restrictive filters.
Check out the article Types of HVAC Filters and Their Uses
-The condition and cleanliness of the blower wheel and fan motor
All filters, even HEPA filters (although not much), allow some particulate to pass through, which will build up within the distribution system and need to be cleaned. As your centrifugal fan wheel begins to collect dirt and dust, it reduces the airflow it can move. The dust and dirt do not evenly distribute along the fan wheel, which can cause it to become out of balance. This can lead to premature motor bearing failure, increased fan noise, and costly emergency repair. An unbalanced wheel puts extra stress on the wheel. You can see in the photo below a fan wheel that broke apart at the hub weld. Keeping the fan wheel clean can help prevent damage.
-The condition of the evaporator and condenser coils.
The Condenser and Evaporator coils transfer the heat or “cooling” to the air needed to heat or cool the space. A dirty coil does not allow the proper heat transfer at the indoor or outdoor air coil. This leads to higher energy consumption and potential damage to vital components such as the compressor. Keeping these components clean, free of obstructions, and protected from damage is key to a properly functioning HVAC unit.
Coil fins that are folded over should be combed out
Dirty condenser coils cause higher energy consumption by preventing heat transfer and increasing head pressure
- The heat exchanger on gas heating units
Gas furnaces can run on oil, propane, or natural gas. They heat the space through indirect combustion. One of the by-products of combustion is CO which is a poisonous gas. Typically this gas stays in the heat exchanger and is sent outdoors through the flue pipe or “chimney.” The heat exchanger should be inspected for cracks or holes during the HVAC inspection.
If the heat exchanger develops a crack or hole, it allows the combustion air to mix into the air being distributed into the space through the ductwork. According to the EPA, all homes should have a CO detector for each individual floor. I like to use the Kiddie Nighthawk in my house due to the display on the front. If you need a CO detector for your home, click the photo to purchase one on Amazon.
Most cracks/holes in HVAC heat exchangers occur where the piping is bent. Make sure to pay special attention to these areas during an HVAC inspection
- Inspect piping, coils, and other components for refrigerant leaks using an electronic leak detector and visual checks for oil.
Oily spots on the coils or refrigerant piping often are good indicators that there is a leak in the refrigerant circuit. An electronic leak detector should be used during the HVAC inspection to check the system. If any questionable areas are found, a leak detection solution such as Cal-Blue can be used to verify.
-Electrical connections
HVAC equipment is constantly subject to vibrations of moving parts such as fan motors, compressors, and actuators. These vibrations can lead to electrical connections becoming loose over time. Loose electrical connections can cause intermittent problems that can be hard to troubleshoot and diagnose. They can also generate excessive heat, as seen in the photos below. All electrical lugs, setscrews, spade connectors, and wire nuts should be verified during the HVAC inspection.
-Operational Safeties
Safeties should be tested to ensure that they are in proper working order. If a safety is found failed during the inspection, it should never be bypassed to allow the unit to run. The safety is meant to protect against harm and damage to the equipment and will need to be replaced before the unit can be operated.
-Refrigerant pressures and temperatures
Using specialized tooling, HVAC technicians will check refrigerant charge levels, unit capacity, and component functions by comparing refrigerant pressures and temperatures. These checks allow the technician to determine whether or not a metering device is over/underfeeding, identity refrigerant charge issues, airflow issues, and more. The technician will use this information to determine superheat, subcooling, wet bulb temp, and dry bulb temp. Using a psychometric chart, can calculate if the unit is running efficiently or not.
-Incoming and outgoing gas pressure
Every gas-fired unit will have min and max incoming gas pressure ratings. During the HVAC inspection, the technician will measure the gas pressure to verify that it’s within range
- Combustion analysis and burner tuning
Using a combustion analyzer, the HVAC tech will sample the combustion air to determine the proper amount of gas and air being fed into the combustion chambers. Different types of burners will have other combustion requirements. It is essential to ensure that burners operate most efficiently to avoid burning excessive fuel; a proper burn is much cleaner and has much safer CO levels.
-Inspect condensate pan, P-trap, and condensate pump for proper operation
Condensate pans, p-traps, and condensate pumps should be inspected and maintained to ensure there are no active leaks and that the components directly in the air stream remain clean and prevent mold and mildew. Pan Tablets should be used to keep the sludge and slime from growing in the pan, algae from building up blocking drains, and preventing burning out pumps.
If you want to keep your system fresh and clean, and prevent drain problem-free, drop in a few pan tabs every time you change your filter. Your home insurance will thank you. Find them here on Amazon.
-Clean the indoor cabinet of the furnace and air conditioner
A cleaned-up, well-maintained unit is much easier to diagnose quickly than a neglected mess. The surfaces should be wiped down so that any new oil, metal shavings, etc., will promptly stand out during the next inspection.
-The condition and programming of the thermostat
During the HVAC inspection, the technician will verify thermostat settings and review any programmed schedule on the thermostat to see if you would like to make any changes. I recommend keeping all heating and cooling setpoints with at least a 4-degree dead band to prevent the unit from fighting itself.
I often see spaces with a heating setpoint at 71 and a cooling setpoint at 72 or 73. the unit may slightly overshoot 71 and kick the unit into cooling, which may cause the unit to go back to heating. Leave the setpoints at least 4-5 degrees apart. This only accomplishes increasing your utility bill while the unit cycles back and forth.
-The condition of the humidifier
The pan or tank should be drained and cleaned to avoid scale and mineral build-up if the unit is equipped with a humidifier. l water lines should be inspected for damage or leaks.
If any of these components are not in good condition, it could lead to problems with your HVAC system. For example, if the air ducts are dirty or blocked, it could reduce the efficiency of your system, increase power consumption, and increase run time while decreasing unit life.
If the blower or motor is not working correctly, it could cause the system to overheat, ice up, or lead to premature compressor failure due to a symptom known as “slugging refrigerant.” This symptom occurs when the refrigerant in the air coil does not pick up enough heat to change state from a liquid to a gas (due to lack of airflow) and returns to the compressor in liquid form. L quid refrigerant returning to the compressor can damage the internals when it attempts to compress liquid refrigerant instead of vapor.
Other issues can also lead to this issue, such as an overfeeding metering device. The frequency of these issues can be minimized by having an HVAC tech routinely inspect and maintain your HVAC equipment with the specialized tools required to perform these inspections.
4. How Do I Prepare For My HVAC Inspection?
When preparing for an HVAC inspection, it is essential to know where your equipment is located and ensure proper access to the HVAC unit to inspect it.
Most residential-type HVAC systems will have two pieces of equipment. The HVAC technician must have access to them both to perform a proper HVAC inspection. The portion of the system generally referred to as the “outdoor unit” is the condensing unit or heat pump condensing unit. Plants, trees, shrubs, and or any other potential to block airflow should be at least 36 inches from all sides of the outdoor unit. This will ensure that the HVAC tech will have adequate space to access the equipment and perform the HVAC inspection.
The second piece of equipment is generally referred to as the “indoor unit,” air handling unit (AHU), or furnace. This equipment is typically located in a garage, attic, or closet. Personal belongings stacked too close around the furnace can also block combustion air, leading to poor performance and damage to the equipment. It is also crucial to keep this equipment free of obstructions so that panel can be removed during the inspection.
5. What Should I Do If A Problem Is Found?
Often, the problems found during an HVAC inspection are relatively minor and do not cost a lot to repair. Some of the common minor deficiencies found during an HVAC inspection are:
Failed/failing capacitor
Worn/pitted contractors
Failed relay
Chaffed wiring
Safety device failed
Dirty coils
Plugged condensate drain line
Dirty condensate pan
Failed condensate pump
It is best to address the problem as soon as possible; that way, you can avoid the minor issues cascading into a more extensive, expensive repair.
6. How Much Do HVAC Repairs Cost?
There are no steadfast rules regarding how much an HVAC repair will cost. It is not uncommon for a compressor replacement to cost somewhere in the $1000-$4000 range. Due to the varying range in complexity, type, and size of HVAC equipment, you will need to consult with an HVAC service tech in your area for accurate pricing.
7. Should I replace My Unit?
As your equipment begins to near the end of its anticipated useful life expectancy, it is usually best to start planning and budgeting for replacement. Major component failures, such as compressors, evaporators, or condenser coils, can be costly. It may not be worth throwing money at a unit that will likely continue to deteriorate vs. replacing it. Consult your local HVAC service advisor to determine the best course of action for you.
8. Home Warranty For HVAC Equipment?
If all of this worries you about the cost of maintaining and repairing your HVAC system, there is some good news. Fortunately, many home warranties available can offset or cover the cost of a central HVAC repair.
9. Conclusion
As you can see, an HVAC inspection should be an essential part of routine maintenance for any property or home equipped with an HVAC system. Following the guide here will help ensure that you select an HVAC maintenance inspection program that is thorough enough to help to prolong the useful life of your HVAC equipment and keep it running smoothly for years to come.
As an Amazon Associate HVAC Tool Review earns commission from qualifying purchases


